


8 Youth Soccer Drills Defense Coaches Can Use

A defender sprints straight at the ball, arrives too fast, opens up square, and gets beaten with one touch. Coaches see that moment every week. The problem usually isn't effort. It's that the player hasn't learned the approach angle, the support picture behind them, or whether the right decision is to tackle, delay, or recover.
Good defending in youth soccer is built in layers. Young players first need body control, balance, and the habit of slowing attackers down. Then they need to understand pressure and cover with a teammate. After that comes team shape, transition reactions, and the ability to read pressing moments instead of chasing the ball.
Age matters. Players ages 4 to 7 should experience defending through playful chasing, shielding, and small-sided games. Ages 8 to 12 can start learning pressure, cover, marking, and compactness. Older players can handle pressing triggers, line movement, and transition decisions that look more like the adult game.
That's how this guide is organized. These youth soccer drills defense activities move from individual pressure to coordinated team defending. Each one includes practical setup ideas, coaching cues, age-based adaptations, realistic progressions, common mistakes, safety notes, and where the drill fits best in a session.
1. 1v1 Pressing Drill
This is the starting point for almost every defending curriculum that transfers into games. If a player can't close space under control, no amount of team tactics will save the duel.
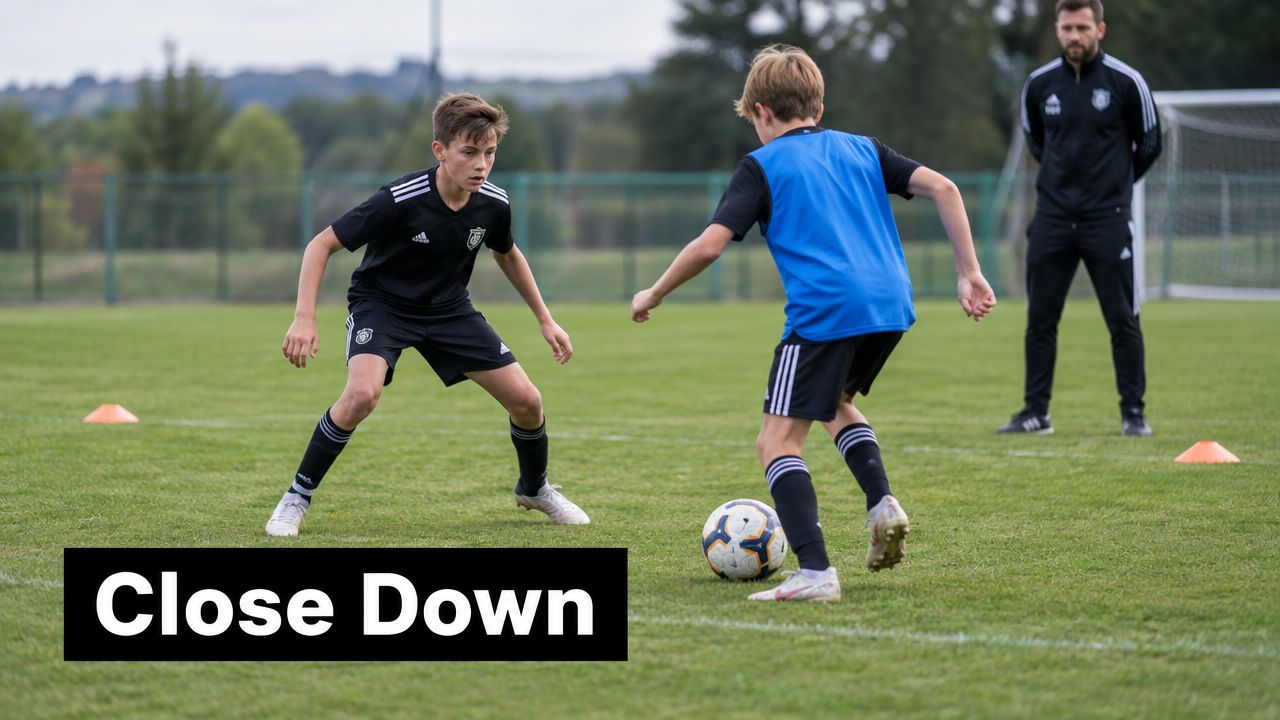
Set up a small channel or grid and run short, repeated duels. Evidence-based youth defending guidance commonly uses 8 to 10 minute blocks in a 5x15 meter or 10x10 meter area with 5 repetitions per player per side, because that gives players enough attacker-defender contacts to train delay, angle, and tackle timing without dragging the activity on too long.
How to run it
Start the attacker with the ball at one end and the defender a few steps away. On the coach's signal, the defender closes quickly, then slows down before contact distance. The main cues are simple: side on, bent knees, show away, don't stab.
For ages 4 to 7, make it playful. Use shadowing, mirror races, and “keep them out of the castle” games where the defender wins by containing, not tackling. For ages 8 to 12, add controlled ball-winning moments and teach the choice between poking a loose touch and continuing to delay. For ages 13 to 18, make the duel directional and add the next action after the win or loss so the moment doesn't end at the tackle.
Practical rule: If the defender arrives fast and then brakes into balance, the rep usually looks good. If they arrive at top speed and stay at top speed, they usually get beaten.
What to coach and what usually goes wrong
The biggest mistake is diving in. The second is approaching square, which gives the attacker both sides. A third common error is coaching every rep like the only success is a tackle. In good defending, delaying and forcing play wide is often the win.
Useful progressions include:
Add direction: Give the attacker one gate to attack so the defender can practice showing one way.
Add support: Turn it into 2v2 once players can pressure without lunging.
Add transition: If the defender wins it, they attack a mini-goal immediately.
Use this right after the warm-up or before a small-sided game. It wakes players up and gives you clean repetitions of the most important individual defending habit.
2. Defensive Shape and Positioning Drill
A back line can win the first duel and still concede on the next pass if the group loses its spacing. This drill teaches defenders to move as one unit, protect the middle, and stay connected while the ball travels.
Set up a rectangle with enough space for width and depth. Use 3v2, 4v3, or 4v4 depending on age and numbers. The attackers move the ball side to side or try to play through the unit. The defenders shift together, keep compact distances, and decide who presses, who covers, and who tucks in.
How to run it by age
For ages 4 to 7, strip it right back. Use three defenders without positions, walk the ball with your hands or feet, and ask the group to slide together like a curtain. Keep rounds short. The goal is simple recognition. Ball moves, team moves.
For ages 8 to 10, add clear zones and starting spots. Players at this age need a picture they can repeat. Stop the drill often, reset body shape, and show them how one defender steps while the others narrow behind the ball.
For ages 11 to 14, allow freer passing and add a target goal or end zone. Now the unit has to read timing, not just cones. Communication starts to matter more because the picture changes faster.
For ages 15 to 18, connect lines. Run the drill with a back four and midfield line, or use a back three plus wingbacks depending on your system. The trade-off becomes real here. If the line squeezes too hard, space opens behind. If it drops too early, opponents can play in front and turn.
A coach can also tie this work to basic team structure. If parents or players need a simple refresher on back lines, midfield spacing, and role relationships, this overview of understanding soccer formations helps frame why shape matters before the tackle ever happens.
Coaching cues that hold up in games
Use cues players can carry into match speed:
Shift on the pass: Start moving while the ball travels, not after it arrives.
Protect the middle first: Make play go around the block.
Stay connected: Leave no easy gap between defenders.
Half-turn and scan: See the ball and the player you may need to track.
One steps, others adjust: Pressure only works if cover moves with it.
Good defending shape often looks quiet. That usually means the distances are right.
Progressions, session placement, and common errors
Place this in the main block of the session, after individual pressure work and before larger transition or team defending games. It fits the development pathway well because players first learn how to defend their own space, then how to share it.
Progress the drill by changing one variable at a time. Start with guided ball movement. Then add free passing, a neutral player, or a rule that rewards split passes. For older players, finish with a live phase where the defending group can win the ball and play out.
The common errors are predictable. Young defenders chase the ball and leave the middle open. Older players often flatten into one line, which removes cover. Fix both by freezing the picture, moving players a few yards, and restarting from the same moment.
Keep the distances age-appropriate and avoid long recovery runs for the youngest groups. For U4 to U7, coaching the picture matters more than speed. For teenagers, game speed matters, but shape still comes before tackling.
3. Defensive Transition Drill
The turnover happens near midfield. One player hangs their head, one dives in alone, and the opponent is already running at your back line. This drill teaches the reaction that has to come before the recovery run.
Use it after players have worked on individual pressure and before full team defending. That placement matters. Players need to recognize that transition defending starts with one clear action, then quickly becomes a group problem.
Set up a small-sided game or directional possession grid with goals or target gates. When possession changes, the team that lost the ball has a short window to defend the moment. For young players, that may just mean slowing the attack and getting numbers behind the ball. For older players, it can mean deciding whether to counterpress or drop into shape based on the picture in front of them.
Teach the first reaction clearly
Keep the script simple:
First defender: Close the ball fast, then slow down the last steps.
Second defender: Take away the inside pass or the easiest forward option.
Third and fourth defenders: Sprint back through central areas and rebuild numbers behind the ball.
Whole group: Recover with urgency, but do not all chase the same action.
For U4 to U7, strip this down even further. On loss of possession, ask one player to go to the ball and everyone else to run back toward their goal. Use very small spaces and short rounds because the lesson is recognition, not tactics.
For U8 to U10, add roles. Name the nearest player, the helper, and the recovery runners. Young players at this age can follow a three-part cue well if the field is not too big.
For U11 to U14, use a rule such as five seconds to win it back or get compact. That forces faster decisions without turning the drill into chaos.
For U15 to U18, coach the trade-off. If the new ball carrier is facing their own goal or has poor support, press hard. If they can play forward early, recover, delay, and organize the next line.
Run the drill with clear constraints
A simple format works well. Play 4v4, 5v5, or 6v6 in a tight area with two goals. Award normal goals, but give an extra point if a team wins the ball back quickly after losing it and creates a shot within the same phase. That scoring rule sharpens the reaction without long coach stoppages.
Another option is wave-based transition. One team attacks goal, the goalkeeper or coach serves a new ball to the other team after the attack ends, and the first team must defend immediately. This version suits older groups because the distances and decisions look more like the game.
Keep recovery distances realistic. Younger players do not need long sprints to learn transition habits. Teenagers can handle bigger spaces, but only if the work-to-rest ratio stays sensible and the quality of reactions stays high.
Coaching cues, common errors, and safety
The common mistake is not effort. It is disorganization. One player presses, no one covers the next pass, and the recovery run starts too late.
Use short, repeatable cues:
Ball first, brakes on.
Stop the first forward pass.
Recover through the middle.
Talk early.
Win it, or delay it.
If players keep arriving wild, reduce the space and coach body control on the approach. If they recover deep but never affect the ball, shrink the time allowed for the first pass after a turnover. If older players counterpress every time, show them clips from the drill itself and ask a simple question: could we really win that ball, or did we need to drop?
Keep contact expectations age-appropriate. For the youngest ages, focus on racing back, blocking the route to goal, and recognizing the turnover cue. For older players, increase speed and pressure, but stop the drill if fatigue turns the first reaction into reckless challenges. Transition work gets messy when players are tired, so coach the moments carefully and keep the rounds short enough for good decisions.
4. Sliding and Recovery Defending Drill
A winger gets past the first defender, pushes the ball toward the box, and the recovering player has one job. Arrive under control, protect the route to goal, and use a slide only if the ball is there to be won or blocked safely.
This drill sits at an important point in the defending pathway. Earlier work teaches players how to press and recover shape. This one teaches what to do when they are beaten and still have a chance to affect the play. Used well, it improves emergency defending without turning every duel into a tackle.
Use this only after a full warm-up and on safe grass or turf. A short prep block with agility drills for soccer players helps because players need balance, deceleration, and clean footwork before they practice recovery actions at speed.
How to set it up and who it fits
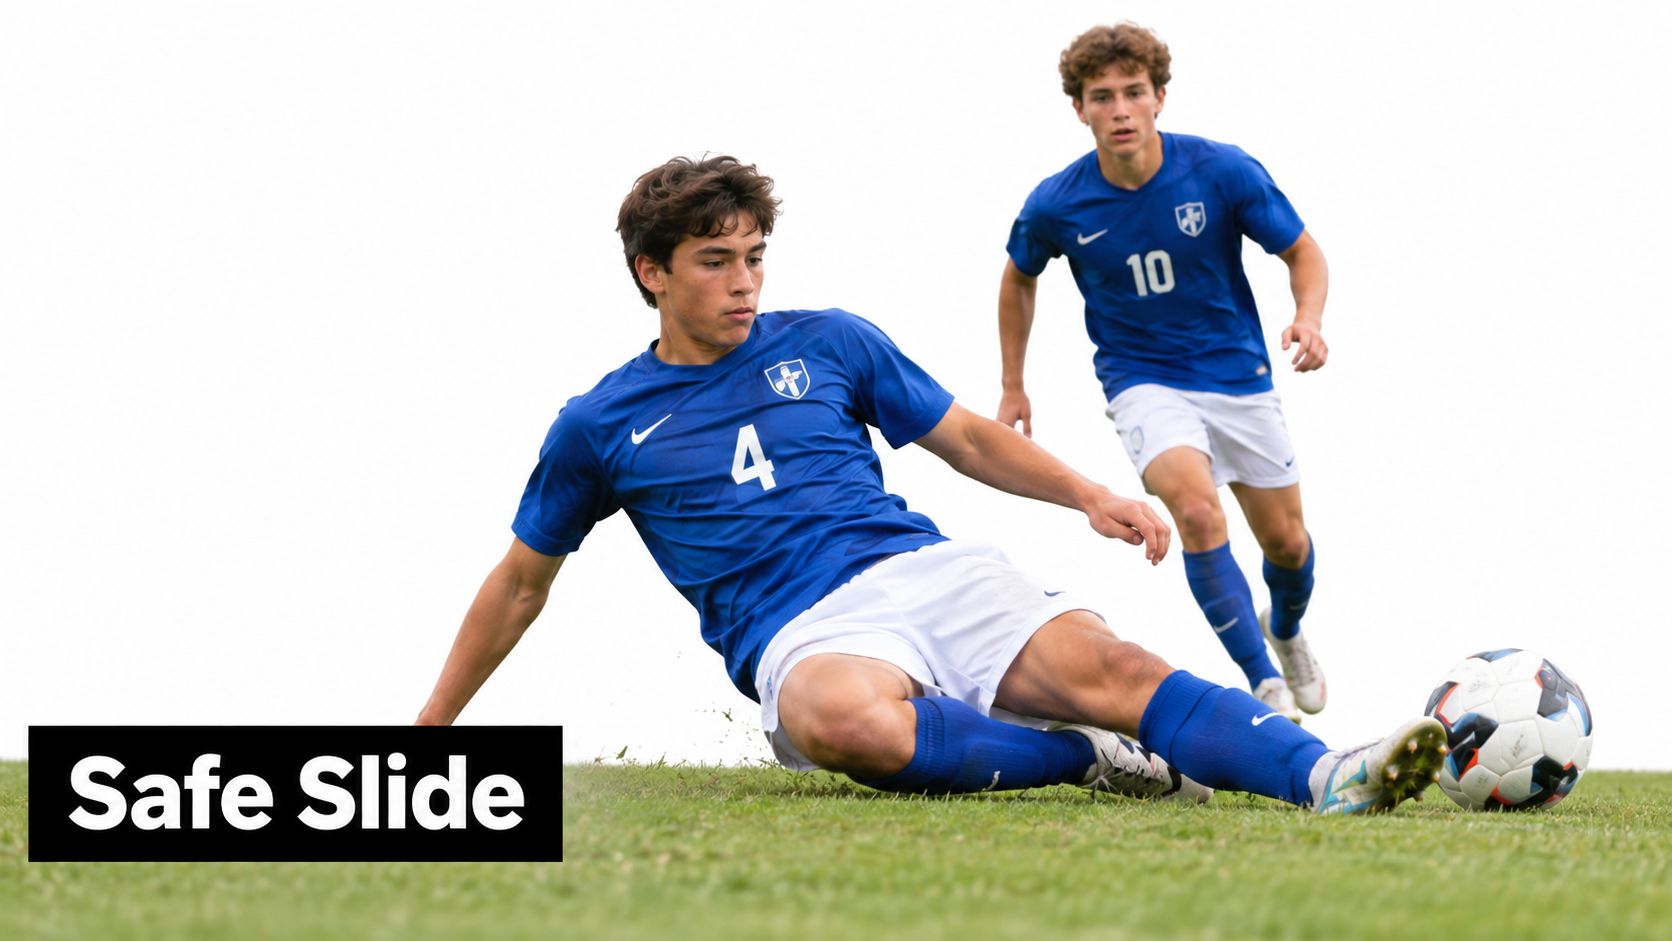
Set up a channel or side lane that leads toward goal. Start the attacker a few steps ahead of the defender so the defender has to recover from behind or from the side. Give the defender two choices. Stay on the feet and angle the play away, or slide to block when the attacker takes a heavy touch or exposes the ball.
For ages 4 to 7, skip the sliding piece. Coach chasing back, getting goal side, and stopping under control. For ages 8 to 10, introduce kneeling or seated slide mechanics on soft ground, then return quickly to the feet. Ages 11 to 14 can perform controlled live reps in small spaces with clear rules. Ages 15 to 18 can work under more realistic speed, with pressure from an attacker and a finish at the end.
Teach the action in a progression
Start unopposed. Players lower the hips, turn slightly to one side, slide along the ground with control, then pop back up and recover for a second action.
Next, add a loose ball to block or hook away. After that, add an attacker entering the channel with a limited number of touches. Older groups can finish with a live recovery race into a 1v1 or 2v2 to goal, where the recovering defender must decide whether to stay up or slide.
That decision is the point of the drill.
If players learn only the technique, they will slide too often. If they learn the cue, they start defending with better judgment.
Coaching cues and common errors
Use short cues:
Run first, slide second.
Show the attacker wide.
Slide through the ball, not through the player.
Get up fast.
If you can stay up, stay up.
The usual mistakes are easy to spot. Players launch from too far away, lead recklessly, or admire the tackle and stay on the ground. Correct that by shortening the recovery distance, slowing the attacker's start, and rewarding the defender only if they recover to the feet and affect the next moment.
A short visual demonstration can help players understand the difference between controlled recovery and reckless tackling.
“Stay on your feet as long as you can. Slide only when the picture is clear.”
Session placement and safety
Place this in the middle of the session, after movement prep and before heavy fatigue sets in. The work is technical, but the decisions matter just as much, so quality drops quickly when players are tired.
Stop the drill right away if surfaces are hard, wet in a way that causes uncontrolled speed, or filled with holes. Keep contact expectations age-appropriate. Younger players need body control and recovery habits. Older players can handle game speed, but only if the tackles stay safe and the technique stays clean.
5. Man-to-Man Marking Drill
The ball gets played into midfield, one attacker checks short, another spins behind, and two defenders follow the same run. That is the moment this drill cleans up. Players learn who they are responsible for, how close they should be, and when a teammate needs a clear handoff call.
Use a small possession game with matched numbers, then give each defender a direct mark. Start simple. The early win is not stealing every pass. It is teaching players to stay connected to an opponent without losing sight of the ball, space, and the next pass.
This fits well after players have worked on individual pressure and recovery habits, but before full-unit defending. It sits in the middle of the pathway. First players learn to handle their own duel. Then they learn how individual responsibility affects the group.
What this drill teaches at each age
For ages 4 to 7, keep the area small and the rules clear. Use pairs, short work periods, and walking starts if needed. The target is basic awareness. Stay with your player, stay between the player and goal when possible, and react when the opponent moves.
For ages 8 to 10, add more movement and more chances for attackers to check away and come back to the ball. Now defenders should track runs without ball-watching. Praise players who move early, not just the ones who win the ball.
For ages 11 to 14, add switching decisions. If two attackers cross, defenders need to decide whether to pass runners on or stay with the original mark. Communication matters. Early, loud, simple calls solve a lot of problems.
For ages 15 to 18, loosen the strict assignments. Older players need to feel the trade-off between staying tight to a mark and protecting team shape. If a center back follows too far into midfield, someone else must cover the space left behind. That is a real game problem, and this drill should expose it.
Coaching points that actually change the rep
A good marking rep usually comes down to four habits:
See both: Open the body so the player and the ball stay in view.
Stay connected: Close enough to affect the next pass, not so tight that one move beats you.
Move on the opponent's movement: Do not wait for the pass.
Talk before the problem: Call switches early, not after runners have already crossed.
Young defenders often make one of two mistakes. They either chase the opponent everywhere, or they watch the ball and lose the runner. Correct both by freezing the picture and showing the reference points. Where is the ball? Where is your player? Where is the goal? Those three answers usually clean up the decision.
Progressions and realistic constraints
Start with a simple possession game and fixed marks. Then add crossing runs, target players, or end zones so defenders have to sort movement under pressure. For older groups, add a rule that defenders can earn extra points for interceptions after a clean handoff. That keeps the focus on reading the moment, not just following.
Keep the field and the rules honest for the age. Younger players need fewer players, shorter distances, and obvious restart spots. Older players can handle larger spaces and repeated directional changes, but the coaching should still stay clear. If the drill gets too open, the marking detail disappears and it turns into a running exercise.
Session placement and safety
Use this in the middle of the session, once players are warm and able to focus. It works well before larger defending games because it sharpens accountability first.
Watch the contact level. Tight marking can turn into holding, pushing, and careless collisions if the area is too crowded or the tempo jumps too fast. For younger ages, coach body position and tracking, not grappling. For older players, allow realistic contact, but stop the rep if players start wrestling instead of defending.
6. Defensive Block and Line Organization Drill
The moment usually looks the same. One defender sprints out to press, the back line drops on its own, and a simple pass opens the middle. Players are working hard, but the unit is not defending together.
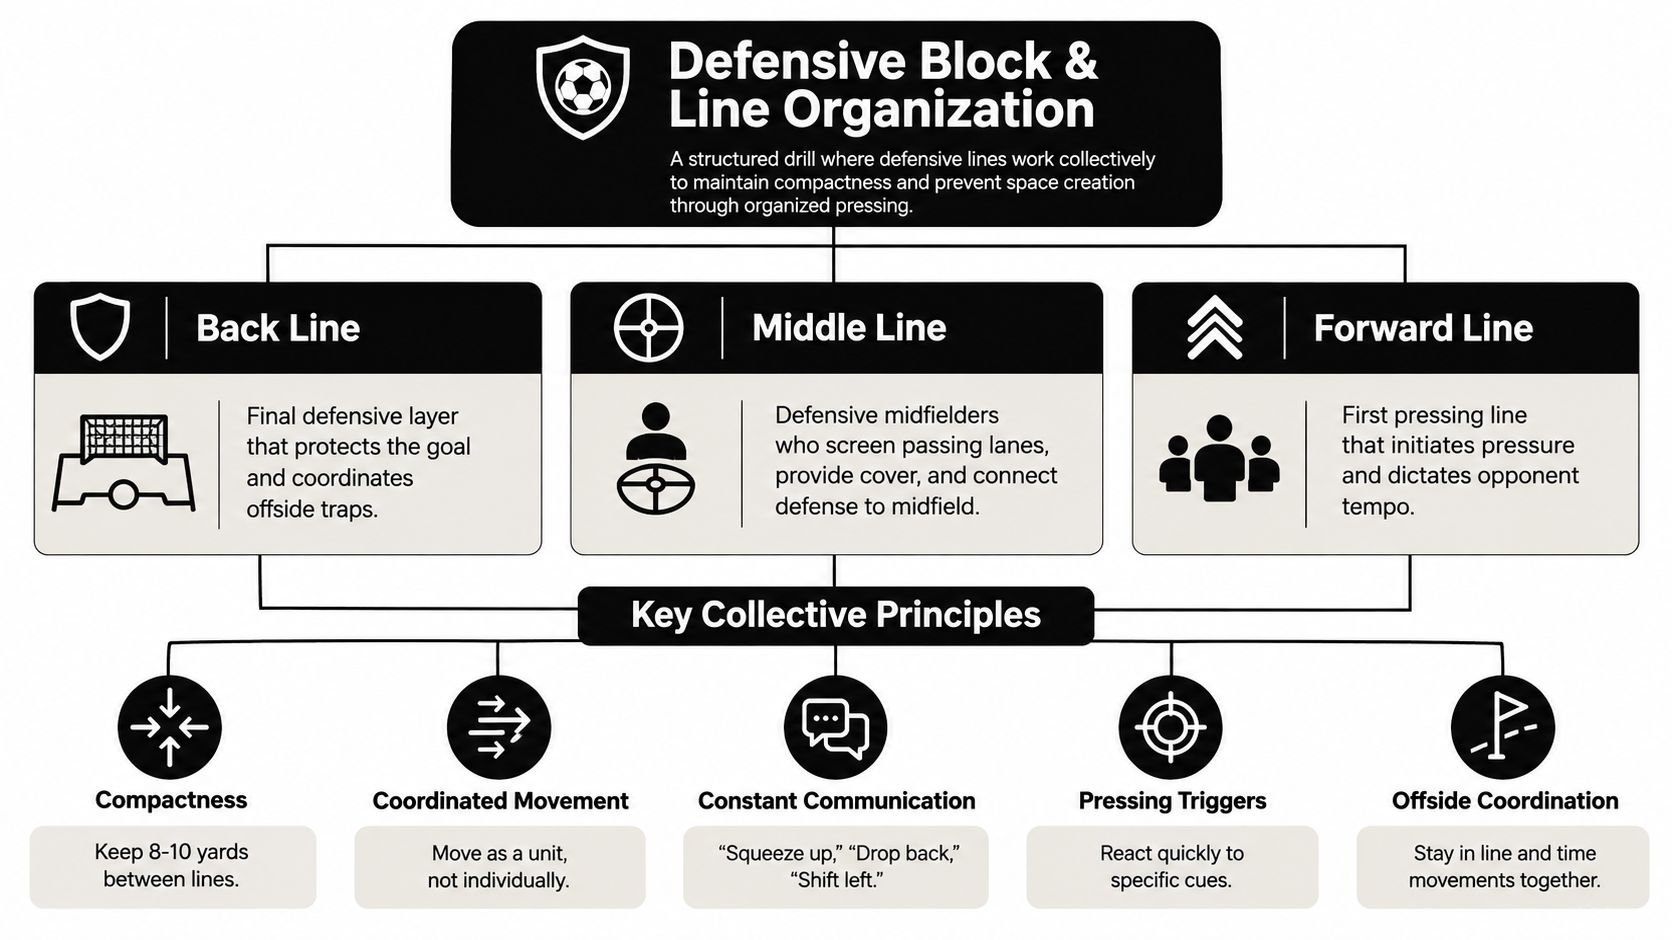
This drill fixes that picture by training the back line and midfield line to move on the same cue. Use a half field or a wide channel toward goal. Set an attacking group in possession and a defending unit behind the ball. The attackers circulate the ball side to side, then look for a split pass, switch, or entry into the front zone. Defenders score by keeping the block compact, denying central passes, and stepping together when the ball travels into a poor receiving angle.
For younger players, keep the job simple. Ages 9 to 11 can work with a back three or back four against a few passers and a target. Coach the line to slide, stop, and recover shape without worrying about offside detail. Ages 12 to 14 can add a midfield line in front, so players start to manage the gap between units. Ages 15 to 18 can work with full team references, including when the line holds, when it drops, and who gives the first call.
The coaching language should be short and repeatable in the game:
Ball moves, we move
Stay connected
Show outside
No straight gaps
Step on the same cue
Distances matter more than speeches. If one line shifts and the next line stays still, the opponent finds the pocket. If the whole block drops too early, the team invites pressure and loses the chance to intercept higher up. I usually correct the space between players first, then the timing of the step, because better spacing solves a lot of late decisions.
Place this after individual and small-group defending work, then before a larger phase of play. It sits well in the second half of a session, once players understand pressure and cover and are ready to defend as a unit.
A practical load note matters here. Research on youth small-sided games found that defenders can face higher physical demands and higher perceived exertion than attackers in some formats according to this PubMed study on young players' positional demands. If the block loses shape late, shorten the work period or reduce the space before assuming the problem is concentration.
Keep the repetitions realistic and safe. Younger groups need fewer players, clear boundaries, and regular stoppages so the line can reset. Older players can handle longer phases and more live transitions, but poor spacing creates avoidable collisions when one player steps late and another covers the same lane. Stop those moments early and reset the picture.
7. Covering and Support Positioning Drill
An attacker beats the first defender, and the whole move often opens because the second defender stood flat or arrived too late. That is the problem this drill fixes.
Use it as the link between 1v1 defending and larger unit work. Players learn how the first defender slows the play and how the next defender protects the space that matters most.
Start with a narrow channel, a dribbler, and two defenders recovering into shape. The first defender closes under control. The second defender arrives a few steps deeper and slightly inside, where they can block the direct path to goal, clean up a missed tackle, or step in if the attacker takes a heavy touch. Keep the picture simple early. Young players need to see the angle before they can read it in open play.
I coach this one as a progression, not a static pattern.
For ages 4 to 7, skip the full support picture and use tag-style chasing games or 1v1 to a gate with a helper recovering behind. Keep distances short, give frequent resets, and avoid crowded starts. At that age, the goal is basic help and recovery, not polished angles.
For ages 8 to 10, run 2v1 or 2v2 to mini-goals. Give the defenders clear jobs. One presses the ball, one protects the gate. Freeze the action when the support player gets level with the pressuring defender, then restage it with better depth.
For ages 11 to 14, remove the obvious gate and let the pair defend a live dribbler in a wider channel. Now they have to read whether to delay, trap wide, or step in together after a poor touch. This is usually the age where communication starts to matter more than effort.
For ages 15 to 18, add a third defender or a trailing runner. That forces the cover player to scan, not just shadow the ball. It also starts to connect pair defending to back-four and midfield support decisions.
The trade-off is simple. If the cover player sits too deep, the attacker gets time. If the cover player crowds the press, one touch can beat both defenders. Good support positioning solves both problems.
Coach the details that transfer to matches:
First defender slows the ball without diving in
Second defender stays deeper and slightly narrower
Both defenders adjust on each touch, not just the first one
Communication stays short: "delay," "left," "inside," "I've got cover"
If the tackle misses, the pair recovers immediately and keeps defending
Place this drill in the middle of the session once players are warm and switched on. It works well after 1v1 pressing or recovery defending, then before a bigger directional game. For younger groups, keep work periods short and reset the starting picture often. For older players, longer live reps are useful, but stop the drill if fatigue turns support into collisions or reckless recovery runs.
8. Pressing Trigger and Recognition Drill
The ball is played back to a center back, the first touch pops up, and three defenders sprint at once. One pass beats all of them. That is the problem this drill fixes.
Use it to teach selection, not just work rate. Players learn to recognize the moment to press, who starts it, and how the rest of the team reacts behind the first action. That makes this a late-stage drill in the defending pathway. After players can handle 1v1 pressure, cover, recovery, and line support, they are ready to read the cue and press as a group.
Set up a directional game in half a field or a long channel with goals. Mark two outside lanes if you want clearer wide traps for younger groups. The attacking team builds from one end. The defending team scores by winning the ball and finishing quickly, or by forcing play into a target zone near the touchline where a trap can happen. Keep numbers realistic for the age. Start with 4v4 plus neutral support for younger teens, then move to 6v6, 7v7, or back-four units with midfield help for older players.
Coach it in phases.
First, name one or two triggers and only reward presses on those cues. A poor first touch works well. A pass into a player facing their own goal also works well. Once players can see those moments, add the next layer: bouncing balls, square passes near the sideline, and slow passes into crowded central spaces.
Then make the decision live. If the trigger appears and support is close, the nearest defender goes. If the picture is wrong, the team drops, delays, and protects the middle.
A simple call sheet helps:
Back to goal. Step tight and stop the turn.
Bad touch. Press hard, second player closes the next pass.
Ball near touchline. Curve the run and trap outside.
Clean first touch with open body shape. Hold shape and screen forward options.
This drill changes a lot by age.
For ages 9 to 12, keep it small and coached. Use obvious triggers, freeze the play, and ask, "Press or hold?" They do not need a full team press. They need to connect the cue to the action and recover safely if they guess wrong.
For ages 13 to 15, add direction, restarts from the coach, and a scoring rule that rewards forced errors. Now communication matters. The first defender calls the trigger. Teammates lock passing lanes instead of chasing the same ball.
For ages 16 to 18, make it look like the weekend match. Use unit-based pressing with center backs, fullbacks, and midfielders. Add trade-offs. If the front player jumps late, the pass splits the line. If the back line squeezes too early, one clipped ball creates a footrace. Older players need to feel those costs in the drill, not just hear about them.
Safety matters here because pressing drills can turn into reckless collisions if the space is too tight or the players are tired. Keep clear run-up distances, rotate often, and stop any habit of launching into tackles from the side or behind. The point is reading and coordinated movement, not chaos. That fits the broader youth guidance toward age-appropriate defensive technique and decision-making discussed in this research discussion on youth soccer heading and safety considerations.
Place this near the end of the main practice block, after the group has already worked on individual and small-group defending. It fits well before an 8v8 or 11v11 game because the cues transfer straight into match play. If players can recognize the trigger under pressure, press together, and recover their shape when the cue is not there, the defensive pathway is doing its job.
Youth Soccer Defense: 8-Drill Comparison
Drill | Implementation Complexity 🔄 | Resources ⚡ | Expected Outcomes ⭐ | Ideal Use Cases 📊 | Key Advantages 💡 |
|---|---|---|---|---|---|
1v1 Pressing Drill | Low–Moderate, simple grid and clear cues | Minimal, 10x10–15x15 yd, cones | ⭐⭐⭐, improves 1v1 defending, first/second touch | Warm-up or pre–small-sided game; U8+ | Adaptable, low equipment, builds defensive confidence |
Defensive Shape & Positioning (4v4 Box) | Moderate, needs role clarity and coaching | Medium, 30x40 yd, 8 players, cones | ⭐⭐⭐⭐, team compactness, covering, communication | Tactical block / match prep; U10+ | Directly transfers to match situations; teaches team shape |
Defensive Transition (Attack→Defend) | Moderate, timed windows and clear cues | Medium, open area, fitness demand | ⭐⭐⭐⭐, rapid role-switching, counter‑pressing, fitness | After possession work; realistic game scenarios; U12+ | Trains gegenpressing, high engagement and intensity |
Sliding & Recovery Defending | Moderate, technique focus, safety critical | Specific, grass/padded surface, close supervision | ⭐⭐⭐, emergency defending, safer sliding technique | Technique session after warm-up; U10+ | Reduces injury risk; improves lateral quickness & recovery |
Man-to-Man Marking (5v5 Possession) | Moderate, assignments and monitoring needed | Medium, 5v5 area, cones, 10 players | ⭐⭐⭐, marking discipline, tracking, positional responsibility | Possession block / midfield marking practice; U10+ | Clarifies responsibilities; strengthens individual marking |
Defensive Block & Line Organization | High, multi-line coordination and timing | Medium–High, larger area, many players, cones | ⭐⭐⭐⭐, compactness, coordinated pressing, offside use | Tactical phase before 11v11; U12+ | Creates hard-to-penetrate structure; teaches collective movement |
Covering & Support Positioning (1st+2nd Defender) | Moderate, pair roles and spacing drills | Minimal–Medium, small grids, cones, partner rotation | ⭐⭐⭐⭐, effective partnerships, correct cover angles | After 1v1 work; builds defensive partnerships; U11+ | Reduces 1v1 exposure; teaches angles and communication |
Pressing Trigger & Recognition Drill | High, cognitive load, player-led recognition | Minimal, small-sided setups; optional video tools | ⭐⭐⭐⭐, smarter pressing, reduced unnecessary effort | End of tactical sessions / pre-match; U13+ | Improves decision-making; conserves energy through smart pressing |
Turn Defensive Drills Into a Development Path
The best youth soccer drills defense plans don't treat defending as a random collection of exercises. They build habits in sequence. First, players learn how to approach, slow down, and stay balanced in 1v1 moments. Then they learn how one defender pressures while another covers. After that, they start understanding shape, marking references, transition reactions, and collective line movement.
That progression matters because young players can only solve the problems they can see. Ages 4 to 7 usually don't need a long lecture on defensive structure. They need playful chasing games, shadow defending, and lots of small-sided moments where they learn to stay between the attacker and the goal. Ages 8 to 12 are ready for pressure, cover, simple marking, and compactness. Older players can work on pressing triggers, line coordination, and whether to counter-press or recover.
A practical session plan works better when you choose one main defending behavior and coach it repeatedly. If the theme is 1v1 pressure, start with movement prep, then isolate the duel, then place it inside a small-sided game. If the theme is transition defending, use a possession activity that naturally creates losses of possession, then finish with a game where immediate reaction matters. Players improve faster when the same idea appears in more than one form.
Keep the demands realistic. Rotate roles often so attackers learn what defenders see and defenders learn what attackers are trying to do. Be careful with contact-heavy work, especially with younger players. Strong defenders aren't built by telling kids to tackle harder. They're built by teaching body shape, patience, decision-making, communication, and recovery habits that hold up under pressure.
The final test is always transfer. Finish with a realistic game and watch for the behavior you coached. Does the first defender arrive under control? Does the second defender take a useful angle? Does the team react quickly after a turnover? Those answers tell you whether the drill worked.
For families looking for a structured environment to develop those habits over time, Villarreal Houston Academy offers age-appropriate programming for boys and girls from age 4 upward in the Greater Houston area, with teams, camps, clinics, and tryouts shaped by Villarreal CF methodology. That kind of long-term pathway matters because defending improves most when players revisit the same core ideas at the right stage of development.
If you want your player learning defensive habits in a structured setting, Villarreal Houston Academy offers year-round teams, camps, clinics, and tryout opportunities for boys and girls from age 4 upward. Their age-appropriate training pathway fits the same progression in this article, from early 1v1 defending to more advanced team concepts. Explore programs and learn more at Villarreal Houston Academy.
Comments